Curtiss H-75 A1/A2

Curtiss Hawk is yet another WW2 subject picked up by Arma Hobby. The series of 1:72 scale miniatures opens with a kit providing the A1/A2 versions, which we will take a closer look at.
Disclaimer
The review sample was kindly provided by the manufacturer. Thanks, Arma Hobby.
Overview
The front of the side-opening box with the catalogue number 70080 features an illustration by Piotr Forkasiewicz. Depicting not a particularly thrilling situation perhaps, but nevertheless quite aesthetically pleasing.
Inside one will find two grey plastic sprues, one transparent (protected by an additional plastic bag, which is nice), a sheet of self-adhesive masks, decals and an assembly guide.
As this is a completely new kit, we have not dealt with any of the above-mentioned items before. So, without further ado, let’s get to the business.
Sprue A, sprue B
Starting, as usual, with a look at the somewhat inconspicuous fuselage halves. Fine, thin, yet reasonably deep panel lines, almost non-existent riveting, and a few raised details.
The tail section was designed as separate parts. Whether it is the vertical stabiliser with rudder…
…or the analogous horizontal elements. All of the airframe's control surfaces, canvas-covered in the original, were accentuated with delicate raised features.
The front of the fuselage has been rather heavily divided, starting with the segment behind the engine compartment.
Then there is the four-part cowling assembly.
Which, in turn, needs to be supplemented with a few details, such as the ends of the distinctive machine gun fairings (parts 18 and 19), the air intake (15), or the not-so-impressive shielded exhaust pipes (3, 5). For the latter, it is worth considering replacing them with 3D printed parts, about which more later.
There are also alternative exhausts without fairings on the sprues (equally impressive), but those should not interest us this time.
In contrast, the plastic Pratt & Whitney R-1830 Twin Wasp looks quite nice. Especially as it will not be very prominently displayed in the finished miniature.
Two rows of cylinders are accompanied by the front section with pushrod covers, in which the three-blade propeller (with two versions of tips – part 14 this time) is seated.
Let's move on to the cockpit, starting with the details moulded directly on the inside of the fuselage halves.
The rear bulkhead was designed together with a simplified frame for the pilot’s seat, which looks pretty decent on its own.
The instruments panel with pedals is yet another element foreshadowing future Hawk variants (this time only part 34 is needed). Not to mention the reflex sight (32), which will leave two unused alternatives on the sprue.
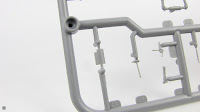
The minor plastic flash on the control stick part probably won't be very noticeable in the finished miniature, but you could remove it just for peace of mind.
Other small equipment details have no such flaws.
The cabin floor should also be mentioned here. It acts as a connecting element between the upper halves of the wings.
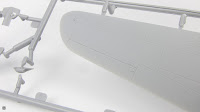
Which look quite similar, detail-wise, to the earlier shown airframe surfaces.
The same applies to the lower parts.
The main landing gear bays sport some nice details.
Some of those can be obscured by parts imitating canvas covers.
But you don't have to do it – the option with visible bay walls (which need to be bent to the right shape) has also been included. Very nice.
There are two, slightly different versions of the front landing gear struts on the sprues, complemented by small braces (23-26) and a whole range of covers.
Bigger.
And smaller.
Plus alternative parts for the variant with the lower covers removed.
Which uses those second, this time unnecessary struts, supplemented by the torque links provided as a separate parts.
Main wheels look quite nice, with slight tyre deflection and a tread (!). Also worth noting here are the rectangular mounting slots, designed to ensure that the wheels are correctly positioned in relation to the ground.
The four-screw covers are separate parts.
The small tailwheel assembly inevitably looks a little bit worse. Note that the relevant canvas cover was cast together with the fuselage halves.
All sorts of little bits and pieces remain to be mentioned: the Pitot tube (two variants: 40, 41), dorsal antenna mast (22 and 39 presumably for the future Finnish box), fuel tank filler cap (30), and the wing machine guns barrels (27, 28). Replacing the latter one with resin or metal aftermarkets might be a good idea, if you ask me.
The small part number 24 from sprue B is a bit of a mystery. For me it looks like a drain from the hydraulic system, located at the bottom-rear of the fuselage (present in Hawks A1/A2).
However, the assembly manual completely ignores the use of this detail.
“Glass”
The third plastic frame covers the transparencies, mainly the cockpit glazing. Two variants of the windscreen.
Plus the sliding part of the canopy and the fuselage windows behind the cockpit (designed, thankfully, with the framing).
There is also a pair of small details, of which one will only use the “glass” for the under-wing reflector this time.
The overall impression is very good, both in terms of clarity and the thickness of the parts. A bit of a surprise, however, is the necessity to drill an access hole for the fuel filler in one of the side windows.
Masks
The set also includes a small sheet of masks, cut in the familiar and much-loved yellow adhesive paper.
Those will make painting both the glazing and the wheels a bit easier.
Decals
The marking sheet is the result of a collaboration between the kit manufacturer and Techmod company.
Unfortunately, I can complain a little this time – the orange colour in the markings for the silver machine was printed with a noticeable (albeit admittedly small) offset in my case.
The decal design did not take into account modellers who prefer to paint the main markings – we only get the rudder captions integrated into the tricolour background. A bit of a shame.
The sheet also features the instrument panel (duplicated) and a number of stencils, including those for the cockpit interior.
Pilot’s straps are also here, if you like them like that.
Manual
The booklet with the step-by-step build guide is typical for AH. Clear and easy-to-follow assembly drawings sprinkled here and there with additional comments.
Suggested paints listed in a table.
Paint schemes, as usual in colour, with decal placement key.
Standard.
Digital bonus
The manual also contains a link for downloading an STL file with accessories for 3D printing: bulkhead with seat and belts, instruments panel, exhaust tubes with covers, gun barrels and assortment of gunsights.
Of course, access to a 3D printer is essential in this case.
Painting options
With the included decals, one can make a miniature in one of three finishes shown at the back of the box.
Curtiss H-75 A2 no. 107 (U007), GC 1/55, pilot 1Lt. Jan Zumbach. Bordeaux, June 1940.
Curtiss H-75 A1 no. 16 (U015), 1. escadrille GC I/5, pilot Sgt Léon Vuillemain. Reims, Spring 1939.
Curtiss H-75 A1 no. 35 (X834) , 3. escadrille GC II/5 “La Fayette”, pilot Adj. Marcel Dougoujon. Toul-Croix-de Metz, November 1939.
Note that the Zumbach's machine can also be made with an earlier, slightly different set of markings.
Summary
There is one particularly important thing missing from this kit. I am, of course, talking about sink marks in the plastic parts, of which I found none. Moreover, a tiny amount of flash present is basically negligible. The times when I could complain about the transparencies in the AH kits are also long gone.
In this context, the decals appear to be the weakest part of this set, which is somewhat of a surprise. However, I would hazard a guess that I just happened to get a slightly flawed copy and that this is not the case with the entire run.
Nevertheless, the new kit from Arma Hobby makes a very good first impression and is undoubtedly an interesting proposition for 1:72 scale aviation enthusiasts.
I like it.


