Ki-43 II Hayabusa

It's been a long wait for a totally new 1:72 scale model from Arma Hobby, but it's finally happened – a brand new Ki-43 Hayabusa kit just hit the stores. Was it worth the wait? Let's find out.
Disclaimer
The review sample was kindly provided by the manufacturer. Thanks, Arma Hobby.
Overview
70078 is the catalogue number of the set in question, packed in the characteristic blue-accented box with a nice illustration on the front.
Its contents consist of two grey plastic sprues, a single transparent one, self-adhesive masks, a decal sheet and a manual.
All brand new, so let's move on to a close examination of the various components of the kit.
Sprues A and B
Let's start as usual with the fuselage, the halves of which are marked with thin, if a little shallow, recessed panel lines. As for the riveting, well… those who are in favour of it have plenty of room to show off.
Other surface details, such as inspection flaps, are rather scarce, but this is due to the relatively simple design of the original.
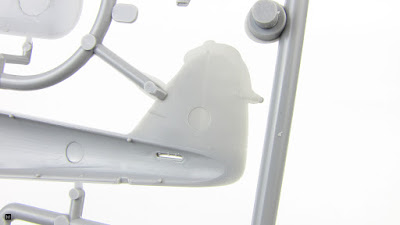
What catches the eye, however, is the considerable amount of flash around the tail. According to the manufacturer's statement, this is due to the very thin rudder, which necessitated the injection of plastic at a higher pressure.
And indeed – the tail is very, very thin. So thin in fact, that it is easy to see the ejector pin mark from the other side. This does not change the fact, however, that this area will require some careful preparation and attention during assembly (generous application of glue on such a thin element is basically asking for trouble).
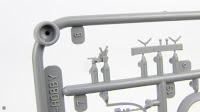
It looks like the mounting slots for the horizontal stabiliser (parts 4 and 5), seen in the above photos, also need some cleaning. The trailing edge of the elevator is far from a thick one.
A little excess plastic can also be found on the front of the fuselage. Fortunately nothing serious, although the overall impression is slightly spoilt.
Arma Hobby didn't limit the mouldings to one version of the aircraft, hence the recesses in the front of the fuselage. One of two variants of the side panels should be glued there.
Matching the type of exhaust pipes present in the real machine, of course.
Depending on the exhausts used, the engine firewall may require minor modifications, as indicated in the manual.
The miniature engine unit with two rows of cylinders looks rather nice, but will hardly be visible in the finished model.
It is supplemented by, among other things, parts with pushrod covers (nice inlet channel, isn't it?).
The entire assembly hides in a rather fragmented fairing.
In its upper part, the outlets of the machine guns (11) should be placed. Drilling the ends may be a good idea here (not to mention removing the flash).
The front of the aircraft is topped by a three-bladed propeller with a cap.
But let's get back to the fuselage halves and take a look at the cockpit area, where the internal structure of the sides is marked.
Here we’ll mount a couple of equipment details, for which small decals have been provided.
The cockpit’s rear frame was reproduced with the pilot's seat back, which is complemented by an inconspicuous base (22).
There is also a headrest in two versions (18+19+23 or 24), which is fitted after the fuselage halves have been glued together. A configuration without one is also possible.
The instrument panel looks pretty nice and is complemented not only by the decals but also by the gun sight part (36). Transparent variant of the latter can also be found on the clear sprue.
The steering instruments mounted to the cabin floor (which links the wing upper parts) are also not bad at all.
Interestingly, the lines on the upper surface of the wing appear to be a tad shallower than those on the lower surface, but I doubt that this will be visible in the finished model.
The thin trailing edge makes a really good impression, and the sagging of the canvas on the ailerons is accentuated very subtly, if not too subtly (this applies to all the control surfaces).
The wing reflector was dealt with rather unconventionally. Its assembly was simply divided between the wing halves, which has both advantages and disadvantages.
If you look closely into the recesses of the main undercarriage bay, you will notice a raised riveting that you will not find anywhere else on the wing.
Unfortunately, a close look at the wings also reveals the ugly plastic bumps we have already encountered on the fuselage, this time a little more prevalent. Small and easy to remove, but nevertheless – a little off-putting.
Additional fuel tanks can be suspended under the wing by pre-drilling the appropriate mounting holes marked on the inside of the wing’s lower halves. There are early-type tanks (20+28+30+33 and 21+27+29+32), mounted directly under the wing, and late-type tanks (13+43 and 14+44), carried on racks.
The latter were also prepared in two variants.
Two radiators can be fitted underneath the aircraft. The fuel one (22), used in the later Ki-43 series.
And the oil cooler (18+19), which consists of two parts. No worries – the surface with the awkward-looking recess is the contact between the part and the fuselage.
The little Hayabusa should be completed also with the landing gear. With rather nice looking struts and their covers.
Slight consternation may be caused by the tiny covers overlapping the wings, so here's a hint: letter to the wing, dots towards the recess, right-left from the pilot's point of view.
The wheels are rather unimpressive detail-wise, especially given the complete lack of tyre tread.
Finally, there are the Pitot tube (37) and the rather unusually mounted antenna mast (38).
In other words, parts that you should probably leave until the end of construction.
Transparencies
The third plastic sprue, transparent one, is dominated by the cockpit's glazing elements. The windscreen, which in my case came loose during the transport, and the sliding part of the canopy. Both with very decent thickness and transparency.
In addition to this, one will find here two more small details. The glass of the wing reflector and the aforementioned second variant of the sight mounted on the instrument panel.
The whole thing looks really good.
Masks
A small sheet of yellow adhesive paper contains masks that will be useful for painting both the canopy frame and the landing gear wheels.
Interestingly, there are also seatbelts here, although the manual doesn’t say a word about using them. My guess is that they should be used in combination with the appropriate decal pieces, which is an interesting idea, although I'm not entirely convinced a good one.
Decals
The marking sheet is, as is common with this manufacturer, the result of a collaboration with Techmod company.
Which means high-quality print with nothing to complain about.
The instrument panel, duplicated, looks quite well too.
There is also a second, tiny sheet added.
It includes revised stripes for the tailplane of the machine depicted on the boxart.
Manual
The booklet with the step-by-step build guide is typical for AH. Clear and easy-to-follow assembly drawings sprinkled here and there with additional comments.
Suggested paints listed in a table.
Paint schemes, as usual in colour, with decal placement key.
Standard.
Digital bonus
The manual also contains a link for downloading an STL file with accessories for 3D printing: exhaust pipes (two types), cockpit’s rear frame with seat and belts, gun barrels, oil and fuel coolers.
Of course, access to a 3D printer is essential in this case.
Painting options
With included decals, one can make a miniature in one of three finishes, all hinted on the back of the box.
Nakajima Ki-43 II Hayabusa, 59th Hiko-Sentai, 3rd Hutai, New Guinea 1943-44.
Nakajima Ki-43 II Hayabusa, 54th Hiko-Sentai, 2nd Hutai, Pilot: Capt Hisashi Koshiishi, Paramushir, Kuriles 1944.
Nakajima Ki-43 II Hayabusa, Hiko Dai 71 Sentai training aircraft, Hofu Airfield, Japan, late 1944.
A small selection perhaps, but relatively varied.
Summary
The new Hayabusa from Arma Hobby is a solid proposition for enthusiasts of WWII Japanese aviation. It may not be the best model from this manufacturer, although some elements, such as the thin tail, are impressive. On the other hand, the plastic bumps, especially prominent on the lower surface of the wing, clearly show that the new tool shop responsible for mould production and the injection process has a bit of work to do.
Overall, I like it.


