Nakajima Ki-84 Hayate Expert Set

The latest kit from the Arma Hobby brand features a completely new subject matter. This time the Warsaw-based model maker decided to focus on a machine with Hinomaru. Ki-84 Hayate to be precise, developed in 1:72 scale, which we will take a closer look at.
Disclaimer
The review sample was kindly provided by the manufacturer. Thanks, Arma Hobby.
First look
Side-opening box with catalogue number 70051 stands out from the other sets of this manufacturer for one reason, the boxart. This time it's the illustration by Shigeo Koike, a renowned Japanese artist, whose work can be found on many Hasegawa model kits.
Inside, no surprises – one (split into two parts) grey plastic injection moulded sprue, one transparent, decals (also in two parts, more on that later), masks, photo-etched parts and a manual.
In my sample I also found annotation: “Pre-production sprue”. So theoretically there could be some minor differences between the plastic presented below and what you will find in hobby shops. But I doubt it.
Plastic once
Let's get down to specifics, starting with the fuselage, which is unsurprisingly split into two main parts.
On which we find rather thin, recessed panel lines, a handful of similarly reproduced rivets and fasteners, and a subtly stressed rudder covering.
Author of the project took a rather unconventional approach to the cockpit area, where the upper part of the fuselage was designed as a separate element. In two versions, depending on whether one wants to make a model with open or closed cockpit canopy.
The engine fairing was also handled in an original way – section was reproduced together with the fuselage halves, the rest has to be glued separately.
A somewhat unimpressive looking exhaust pipes are covered by rather nice cowling gills. The latter are only available in the closed position, which is a bit disappointing, since they are a separately glued element anyway.
The oil cooler, however, has been prepared in two variants – early (smaller) and late (larger).
Elements of the cockpit structure and equipment can be found on the inner side of the fuselage halves.
An unconventional solution, although already known from this manufacturer's earlier models, was implemented in the cabin rear bulkhead, designed together with the seat supporting rack, which has to be bent forward a bit.
Speaking of the seat – well, it's not great, to put it briefly. The thickness is basically unavoidable in plastic. Small sinkmark in the middle is also no surprise. However, I don’t understand the practice of defining holes with raised lines. This approach, occasionally used in previous AH projects (e.g. Wildcats), has found much wider application here. Why? I don't know. In my opinion it is neither pretty, nor realistic, nor helpful.
On the cabin floor, for example, you will find a whole bunch of raised lines, marking both panel edges and openings.
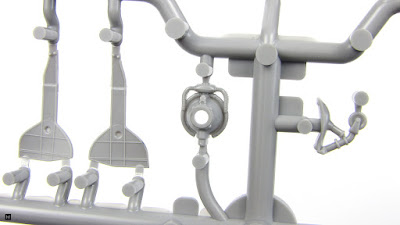
An interesting solution was implemented regarding the installation of control sticks, which are inserted from the bottom, thanks to which they reside in recesses below the floor level.
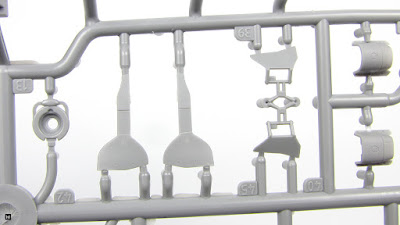
There’s a little bit to complain about the rudder controls. No, not because they are clunky – in this respect it’s not bad. However, as far as I know the whole thing should form slight arc, while the pedals are set on a straight as a die bar (by the way – the element next to it is the gunsight base).
The raised lines are not a problem on the instrument panel, mounted to the front cockpit bulkhead, which features, among other things, rears of the fuselage guns.
To finish the subject of the cabin equipment – there are also some handles to be mounted on the floor (part no. 3) and the fuselage wall (11).
The miniature Nakajima Homare engine looks quite promising – two full rows with nice cylinder details and tabs to make it easy to install the finished unit inside the fuselage (where the appropriate mounting holes are located).
In addition – a separately glued front with pushrod covers (in two parts) and a reduction gear cover.
If you want to make a miniature with a spinning propeller, take an early interest in the back of the last part and place (not glue!) the propeller shaft (12) there.
On which you can later mount a four-bladed, one-piece propeller covered by a spinner.
The upper surfaces of the wing are in one piece, covered with a grid of recessed panel lines and a handful of other details. Exactly the same applies to the lower surfaces.
In both cases, subtly stressed ailerons looks very nice.
The barely visible sinkmarks at the wing-fuselage transition aren’t worthy of any attention. Especially as this is a pre-production sprue.
Unlike the wing gun barrels (54) and asymmetrically mounted fuel cooler (55).
The element that holds the upper surfaces of the wings together is the quite deep main landing gear bay. It is a pity that raised lines were used here as well.
Slots for mounting the struts are in the lower part of the wings.
“Weighted” wheels aren’t very impressive – just like the original. Although some tyre tread would have been nice.
As well as some riveting on the covers. However, the reproduction of the inner segments' closing mechanism is a nice touch.
As a final word on the subject of landing gear – the quite nice tailwheel.
And its covers.
The elevator is reproduced together with the horizontal stabiliser.
Yes, with quite nice covering sagging.
In terms of underwing ordnance, the manufacturer has offered us a several options. Auxiliary tanks (200 litres) in two parts.
Two, one-piece, 100kg bombs, to which the missing fins are attached in a rather interesting way (cut from the frame together with the handle, glue, cut the handle off).
And one 250kg bomb, in two parts.
Selected load will be suspended on some pretty nice racks.
The only things left on the sprue are Pitote tube (57) and antenna mast (56).
So the “you're going to break it anyway” parts.
Plastic again
The small transparent sprue contains, as you can easily guess, mainly the elements for the cockpit canopy.
Quite nice by the way, thin and transparent.
With open position option.
The only element with a different purpose is the wing reflector.
The whole thing makes a really good impression and the sprue is protected by a separate ziplock bag – so there's not much to complain about.
Masks
Although Hayate's canopy doesn't look too complicated, the small sheet of masks, which also helps to paint the wheels, is a nice addition.
Especially cut in Kabuki paper.
PE
The second bonus typical for the “expert” edition is a small photo-etch fret.
It features a couple of details for the cockpit (pilot's seatbelts, levers), mesh for the oil cooler and a bunch of wires for the engine.
Decals
The included decal sheet was printed by Techmod, which has been a standard for Arma Hobby models for some time now.
The print is clear, the colours uniform and saturated, and there are no layer shifts.
Small stencils and instrument panel gauges looks good too.
The kit also includes a small supplement with wing fuel tank markings in yellow, added after consultations with Japanese modellers.
The whole thing looks excellent, at least on paper.
Manual
The booklet containing tips on building the model doesn’t differ too much from Arma Hobby previous ones. Clear and neat assembly drawings.
And moments that require a little bit of thinking.
The table with suggested paints finally includes references to Mr. Color (Gunze) products, which have replaced the archaic Humbrols. Good.
Colourful paint schemes also provide directions for decal placement.
So, a standard.
Painting options
Decals included in the kit contains markings for six painting schemes. Quoting the manufacturer, those are: Ki-84 Otsu (armed with 4 cannons 20 mm), 104 Sentai, Ota airbase, Japan, August 1945.
Ki-84 Ko serial no. 1446, 2 Chutai 11 Sentai, Philippines, 1944/45.
Ki-84 Ko, 10 Rensei Hikotai (Operational Training Unit), Lt. Takata, Japan, spring 1945.
Ki-84 Ko, 3 Chutai 47 Sentai commander’s Cpt. Hatano airplane Japanese Home Defence Forces (Hondo Boei Butai), Narimasu, Japan, February 1945.
Ki-84 Ko, 57 Shimbu-tai, Mijokonojo airbase, Kyushu, Japan, Battle of Okinawa, May 1945.
Ki-84 Ko, 2 Yuso Hikotai (ferry formation), Lt. Shuho Yamana ferried this airplane from Nakajima factory airfield in Ota to the base in Saigon, summer 1944.
No bonuses this time, only what is on the back of the box.
Summary
It seems that this is currently the best Hayate in 1:72 scale, which in itself doesn't mean much, as the competition is pretty weak. Ancient Hasegawa? The unavailable, shortrun Sword? Arma Hobby hit the nail on the head with this topic, and the kit itself looks pretty good too. There are a few things that can be complained about, but it is certainly a nice starting point to build an attractive Ki-84 miniature in my favourite scale.


