Slightly larger P.11c

Recently PZL P.11c is a surprisingly popular topic among Polish scale model manufacturers, considering the amount of newly developed kits. Arma Hobby just released another miniature of this particular Polish type, debuting with it in 1:48 scale. How did it turn out? Let's see.
Disclaimer
The review sample was kindly provided by the manufacturer. Thanks, Arma Hobby.
The Box
The model is packed in a side-opening box, the front of which features illustration by Piotr Forkasiewicz. Very nice one, to be honest.
Inside, the whole thing is reinforced with a cardboard insert, which holds all the kit elements. So without any worries you can put it in a stash, cover with other "to do" boxes, and forget about it for years.
Previously carefully probing the content: one injection-moulded light grey plastic sprue, an injection-moulded transparent windscreen, a small photo-etched plate, a similar-sized sheet of masks, decals and an assembly manual with attached errata.
As you can see, we are dealing with the "Expert" edition, enriched with metal & sticker extras. Let's take a closer look at the individual components, starting with the plastic parts.
Lonely sprue
All the plastic parts (except the windscreen of course) have been crammed into one injection moulding sprue. Modellers who are more sceptical about AH products will be pleased to noticed the return of an old friend – small sink marks can be spotted on some parts. One small overflow of plastic is barely worth mentioning.
Fuselage halves are marked with rather thin, recessed panel lines. With some, curiously asymmetrically distributed, omissions ( which are reported in the attached errata). Fortunately quite easy to rectify. An odd situation, but also quite interesting. While I can understand the lack of a line on the left half of the fuselage ( the vertical one, just in front of the first aid kit compartment), which was overlooked early at the design phase (judging by the published 3D model renders) – what happened with the one on the right half (the short, vertical one, just behind the wing slot) which appeared on the published pre-production renders?
In addition to the recesses, you will also find some raised details in the form of panel hinges and clips. Just some, though – don’t expect fully riveted miniature.
Raised strips reinforcing the rear of the fuselage were left out and are marked only with recessed lines. Shame.
Another disappointment comes with recesses in the front of the fuselage, which mimic the perforations of the real aircraft. And not because they are just indentations, but because of their shape. In reality, they are similar to the letter "D", and this is also how they looked on the renders published by the manufacturer. In the model, however, for some reason the indentations become much more oval.
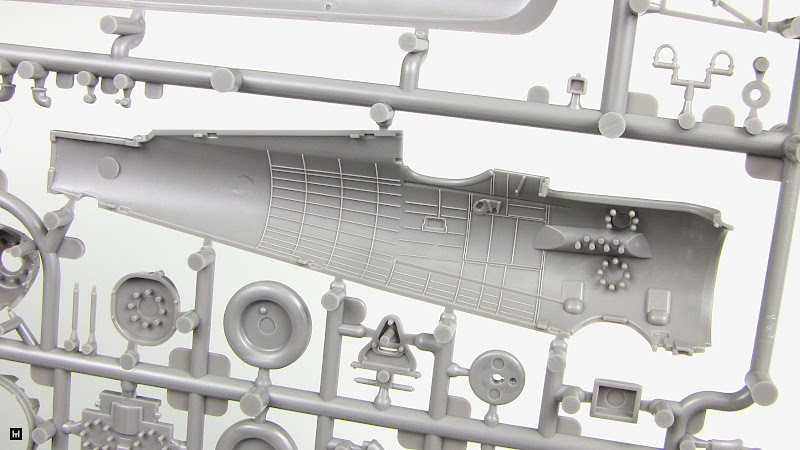
Inside, details of the stressed skin construction are finely marked.
Fortunately, the ejectors are positioned in such a way that the marks they leave behind do not devastate that.
Sections of fuselage frame visible in the cockpit were reproduced with some of the equipment details directly included.
Unfortunately, with addition of some sink marks.
Other equipment we will have to install ourselves. Both the small ones, such as the oxygen manifold board (no. 17).
As well as the larger ones. Such as pilot oxygen system cylinder.
Or the starter ("Viet").
Plus, of course, the fuselage machine guns with trimmed barrels (there is no hole in the recesses). Note the mounting pins, and cut carefully.
Frame sections are glued to the floor.
Previously fitted with a rudder bar.
Control stick.
Base of the seat.
And the seat itself. With rather uncomfortable looking bumps at the bottom.
The headrest needs to be sanded down slightly (see errata) before fitting can be packed into the fuselage.
While not forgetting about the instrument panel.
And rather easy to miss details of the undercarriage rigging system (part 59).
The fuel tank, or to be more precise – its lower part, has been reproduced as a separate element to be fitted into the appropriate place on the fuselage underside. Next to it on the frame are the previously mentioned external portions of the hull gun barrels.
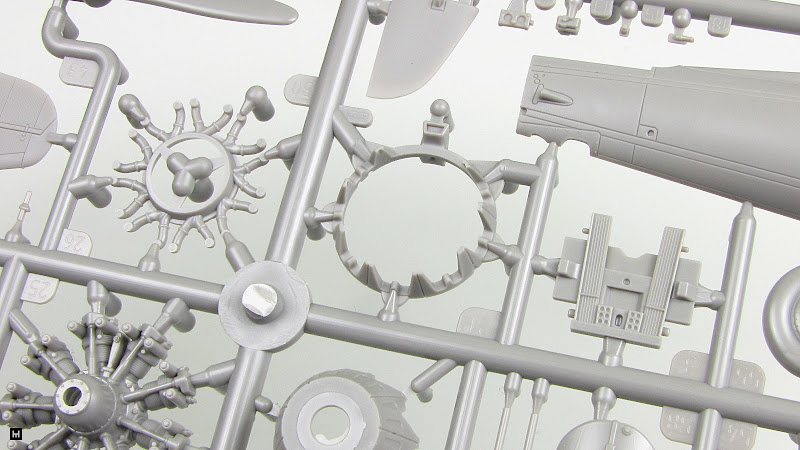
Engine assembly was obviously designed with more detail than the 1:72 counterpart. We have the base.
To which we attach the rear part of the crankcase cover.
Intake manifold.
And of course the engine itself.
Which will be covered, at least partially, by the front of the crankcase cowl. A bit disappointing due to the blinded holes. By the way, you can see the only overflow of plastic I was able to find in this kit.
The entire assembly will be enclosed in a two-piece cowling.
Complemented by a Townend ring.
Single-piece, twin-bladed propeller...
...will be installed in a two-part spinner (no. 29 and 31). Also note the wing guns barrels – parts number 52 and the air intakes number 23 and 24, which require some drilling.
Fuselage recess for the oil cooler is located more accurately than it was in the 1:72 model, while the cooler itself is obviously quite simplified due to the production technology. Hollowed back of the rather thick element prevents the formation of sink marks.
Those can be noticed on the main undercarriage struts.
On which the wheels will be mounted, reproduced with a slight tyre sag.
Inner parts with brake drums were designed as a separate pieces.
Topic of undercarriage is closed by the tail skid.
I couldn’t find any sink marks on the wing struts.
On the front pair, however, fine raised details can be noticed.
Slots for the said supports can be found on the wing lower surface. Which features fine grooving, raised stripes and drop-shaped shell ejector covers.
The latter can be fitted with a must-have feature of every newly-developed P.11 kit – the so-called "pipe" ejection chutes.
Fine grooving can also be found on the upper surface of the wings, marked with a grid of recessed panel lines , which may not be to everyone's liking (especially when the aileron sports a small presentation of how it could look without them). I am willing to bet that the not-so-subtle aileron pushrod won't be to anyone's liking.
Another missing panel lines, again asymmetrically, probably won't be appreciated also. Neither the one at the bottom.
Or at the topside. By the way, note the jaggedness of the grooves at the wing-centroplane fold.
Covering of the horizontal stabilizer, designed as a single piece with the rudder, was reproduced similarly as in the case of the wing. Arma Hobby has avoided the mistake made on the little P.11c and this time the central panel is not smooth. But why does its grooving look slightly different? Similar difference can also be seen on the upper surface of the wing.
The vertical stabilizer is also integrated with the corresponding control surface. The trailing edge of the latter ( and the rudder too) is not overly thick, but it will probably not be to everyone's liking.
As you can see, none of the control surfaces in the model was designed as a separate part.
Clear part
New Arma Hobby kit can certainly be called single-frame – the inclusion of one clear element, with quite good transparency by the way, does not change this.
The windscreen walls are rather thick, but there is no need to despair. Especially when we take a closer look at the rear edge, naturally very exposed in the finished model, with a thin protruding rim.
By the way, more perceptive readers may note that the author of the colour profiles used in the manual, which serve as a background for the above photos, made the mistake of drawing the under-wing ejectors covers as symmetrical (fortunately they are reproduced accurately in the plastic).
PE
Little photo-etched sheet contains a few additional details, both absent in the plastic (e.g. the gun sight) and improvements of the existing ones (e.g. fuselge gun barrels). The addition of handles mounted on the fuselage under the windscreen is quite unnecessary; even though you won't find them in plastic, the metal ones are not very useful, as they are simply too flat.
We won't find an instrument panel on the sheet – this time the manufacturer favours the use of a two-part decal and a plastic element.
Masks
Equally small is the included sheet of masks, containing stickers designed to help with painting the main landing gear wheels and windscreen frames.
And that are all of the 'expert' extras.
Decals
The sheet printed by Polish Techmod contains markings for four machines.
Whereby for the 8.139 aircraft we are given two variants of markings.
Noteworthy is the 112th Fighter Squadron P.11 art and side number, printed with silver.
In addition to the markings, the sheet also includes an instrument panel in two parts.
What we do not have here, are colour shifts or other printing errors.
Assembly manual
The booklet, which should painlessly guide us through the building process, looks typical for this manufacturer – clear drawings, colour, clearly marked use of photoetched parts. Unfortunately, despite the increase of the format to A4, it is a bit crowded and slightly chaotic, especially at the cockpit interior construction stage.
The table of suggested colours covers seven manufacturers of popular model paints.
The painting variants available in the kit are shown with full-colour profiles containing also information on decal placement.
The kit also comes with an errata, which addresses not only the errors in the manual but also in the mouldings themselves (the need to slightly sand down the headrest or to make the missing fuselage panel lines).
By the way, the first injection molded AH kit in 1:72 – TS-11 Iskra (reviewed here as well) also had missing panel lines and an accompanying errata. Interesting coincidence.
Painting options
As previously mentioned, the markings included in the kit allow us to make one of four machines. We have at our disposal the aircraft of Tadeusz Sawicz from the 1114 Fighter Squadron.
Waclaw Łapkowski’s “2” from 112 Fighter Squadron.
Unique aeroplane in experimental camouflage.
And a post-evacuation machine in Romanian uniform, unarmed.
There is also a small bonus – the first mentioned P.11 can be done with an earlier version of markings.
Summary
It is time to finally answer the question posed in the introduction. In my opinion it turned out quite well, although not great. Although the mistakes of the 1:72 kit were not repeated, new ones appeared – quite... unusual ones. Some of the simplifications and conventions used may also not be to everyone's liking. However, the fact is that we are provided with a nicely designed kit, featuring eye-catching fine details, which will probably appeal to many modellers, not necessarily the "less demanding" ones.
Finally, however, I would like to mention the biggest drawback of the discussed model. As an avid 1:72 fan, I must categorically state that it is simply too large.


